JavaScript知识点
发表于|更新于
|字数总计:2.7k|阅读时长:11分钟|阅读量:
我的Bilibili频道:香芋派Taro
我的个人博客:taropie0224.github.io
我的公众号:香芋派的烘焙坊
我的音频技术交流群:1136403177
我的个人微信:JazzyTaroPie
基本数据类型
- Number
- BigInt
- String
- Boolean
- Undefined
- Null
- Object
- Symbol
作用域
1
2
3
4
5
6
7
| function a() {
if (true) {
let b = 1
}
console.log(b)
}
a()
|
ES6新增了let命令,用来声明局部变量。它的用法类似于var,但是所声明的变量,只在let命令所在的代码块内有效,而且有暂时性死区的约束。
let作为一个定义块级作用域的方法感觉更符合之前学的其它语言造成的直觉…可以简单地理解为在只在最近的{}中有效,比如我们在循环中常用来计数的i。
所以以上的代码是会报错的,因为这个b在if里,外面是拿不到的。
闭包
- 每一个函数在声明时都通过一个叫做 [[Scopes]] 的对象收集外部变量,这个 Scopes 对象内部有一个叫做 Closure 的属性负责收集该函引用的外部函数变量。
- 广义上的闭包从 Lambda 表达示来思考,所有 Scopes 变量收集的外部变量都是闭包。
其实跟上面那个作用域的例子有些关系,详见https://zh.javascript.info/closure
开发者通常应该都知道“闭包”这个通用的编程术语。
闭包是指内部函数总是可以访问其所在的外部函数中声明的变量和参数,即使在其外部函数被返回(寿命终结)了之后。在某些编程语言中,这是不可能的,或者应该以特殊的方式编写函数来实现。但是如上所述,在 JavaScript 中,所有函数都是天生闭包的(只有一个例外,将在 “new Function” 语法 中讲到)。
也就是说:JavaScript 中的函数会自动通过隐藏的 [[Environment]] 属性记住创建它们的位置,所以它们都可以访问外部变量。
在面试时,前端开发者通常会被问到“什么是闭包?”,正确的回答应该是闭包的定义,并解释清楚为什么 JavaScript 中的所有函数都是闭包的,以及可能的关于 [[Environment]] 属性和词法环境原理的技术细节。
- 一个函数有权访问另一个函数作用域中的变量,就形成闭包。
- 闭包可以用来隐藏变量,避免全局污染。也可以用于读取函数内部的变量。
- 缺点是:导致变量不会被垃圾回收机制回收,造成内存消耗。
立即执行函数表达式(IIFE)
数组去重
1
2
3
4
5
6
7
8
9
10
11
12
13
14
15
16
| function unique(arr) {
let map = new Map();
let array = new Array();
for (let i = 0; i < arr.length; i++) {
if(map.has(arr[i])) {
map.set(arr[i], true);
} else {
map.set(arr[i], false);
array.push(arr[i]);
}
}
return array;
}
var arr = [1,1,'true','true',true,true,15,15,false,false, undefined,undefined, null,null, NaN, NaN,'NaN', 0, 0, 'a', 'a',{},{}];
console.log(unique(arr))
|
数组拍平
1
2
3
4
5
6
7
8
9
10
11
| function flat(arr) {
let res = []
for (let item of arr) {
if (Array.isArray(item)) {
res.push(...flat(item))
} else {
res.push(item)
}
}
return res
}
|
Array.isArray() 用于确定传递的值是否是一个 Array
深拷贝
1
2
3
4
5
6
7
8
9
10
11
12
13
14
15
16
17
18
19
20
21
22
23
24
25
26
27
28
29
30
31
32
33
| function deepCopy(data, hash = new WeakMap()) {
if(typeof data !== 'object' || data === null){
throw new TypeError('传入参数不是对象')
}
if(hash.has(data)) {
return hash.get(data)
}
let newData = {};
const dataKeys = Object.keys(data);
dataKeys.forEach(value => {
const currentDataValue = data[value];
if (typeof currentDataValue !== "object" || currentDataValue === null) {
newData[value] = currentDataValue;
} else if (Array.isArray(currentDataValue)) {
newData[value] = [...currentDataValue];
} else if (currentDataValue instanceof Set) {
newData[value] = new Set([...currentDataValue]);
} else if (currentDataValue instanceof Map) {
newData[value] = new Map([...currentDataValue]);
} else {
hash.set(data,data)
newData[value] = deepCopy(currentDataValue, hash);
}
});
return newData;
}
|
感觉不太好背,记得之后问一下重不重要
1
2
3
4
5
6
7
| const list = [{ test: '233'}]
const listCopy = JSON.parse(JSON.stringify(list))
listCopy[0].test = '2333';
console.log(list)
console.log(listCopy)
|
使用JSON实现深拷贝
实现curry
实现效果
1
2
| const curry_fn = curry(fn);
fn(1, 2, 3) == curry_fn(1)(2)(3);
|
实现思路
- 通过闭包的方式储存传入参数
- 通过函数的length属性获得参数个数
- 当参数个数不够时直接返回方法
- 存储的参数个数等于原函数参数个数时执行原函数
- 如果使用ES6参数默认值,length将不等于实际参数个数
- 参数由arguments获取,ES6直接使用rest参数实现
实现
1
2
3
4
5
6
7
8
9
| function curried(fn) {
const args = []
return function executor(...executorArgs) {
args.push(...executorArgs)
if (args.length >= fn.length) {
fn(...args)
}
}
}
|
1
2
3
4
5
6
7
8
9
10
11
12
13
14
15
16
17
18
| function add(){
let args = Array.prototype.slice.call(arguments);
let inner = function (){
args.push(...arguments);
return inner;
}
inner.toString = function(){
return args.reduce(function(prev, cur){
return prev + cur;
});
}
return inner;
}
const result = add(1)(2)(3)(4);
console.log(typeof result);
|
1
2
3
4
5
6
7
8
9
10
11
12
13
14
15
16
17
18
19
20
| function curry(fn, args) {
var arity = fn.length
var args = args || []
return function() {
var _args = Array.prototype.slice.call(arguments)
Array.prototype.unshift.apply(_args, args)
if(_args.length < arity) {
return curry(fn,_args)
}
return fn.apply(null, _args)
}
}
|
使用 this 之前为什么要调用 super
从继承组合来讲解
1
2
3
4
|
function Child() {
Parent.call(this, arguments)
}
|
this
默认绑定
1
2
3
4
| function test(){
console.log(this)
}
test()
|
隐式绑定
1
2
3
4
5
6
7
8
9
| let test = {
name: '233'
age: '2333'
print: function(){
console.log(this.name)
console.log(this.age)
}
}
test.print()
|
硬绑定
1
2
3
4
5
6
7
8
9
10
11
12
13
14
| let test1 = {
name: '233'
sayName: function(){
console.log(this.name)
}
}
let test2 = {
name: '2333'
}
let test3 = {
name: '23333'
}
test1.sayName.call(test2)
test2.sayName.apply(test3)
|
构造函数绑定
1
2
3
4
5
6
7
8
9
| function test1(name){
this.name = name;
this.sayName = function(){
console.log(this.name)
}
}
let name = '233'
let test2 = new test1('2333')
test1.sayName();
|
https://www.sillywa.com/2020/09/30/this全面解析/
var, let, const
- var可以重复定义变量,let和const不可以
- const更加严格,会出现无法重新赋值的情况,但是可以把它指向一个数组,此时相当于一个指针,可以对数组中的元素进行修改
- let, const支持块级作用域
- var, let可以作为循环变量,const不可以
箭头函数和普通函数的区别
- 普通函数 function(){}
- 箭头函数 () => {}
- 函数里面的表达式越少,箭头函数简单明了的特点越明显
- 箭头函数不能被命名,因为箭头函数是函数表达式,而且是匿名的;普通函数可以是函数表达式,也可以是函数声明
- 箭头函数不是构造函数,因为创建的时候程序不会为它创建[[Construct]]方法,所以不能用new
- 普通函数的this指向是动态的;箭头函数的this指向一般是全局对象,若被普通函数包围住,这个this就绑定包围函数的this
- 普通函数可以用call, apply和bind修改this的值,箭头函数不可以
Promise
基本用法
1
2
3
4
5
6
7
8
9
10
11
12
13
14
15
16
17
18
19
| const judge = true
const promise = new Promise((resolve, reject) => {
if (judge){
resolve('233')
} else {
reject('2333')
}
});
promise
.then(name => {
console.log(name)
})
.catch(name => {
console.log(name)
})
.finally(() => {
console.log('hh')
});
|
用于检查图片url是否正确
1
2
3
4
5
6
7
8
9
10
11
12
13
14
15
16
17
18
19
20
21
22
| const imgAddress = 'https://asd.fgh.com'
const imgPromise = (url) => {
return new Promise((resolve, reject) => {
const img = new Image()
img.src = url
img.onload = () => {
resolve(img)
}
img.onerror = () => {
reject(new Error('图片有误'))
}
})
}
imgPromise(imgAddress)
.then(img => {
document.body.appendChild(img)
})
.catch(err => {
document.body.innerHTML = err
})
|
async await
1
2
3
4
5
6
7
8
9
10
11
| async fucntion test(){
console.log('1')
let two = await Promise.resolve('2')
console.log(two)
console.log('3')
return Promise.resolve('hhh')
}
test().then(value => {
console.log(value)
})
|
引擎在遇到await的时候会等待直到Promise状态完成并且返回结果
Ajax
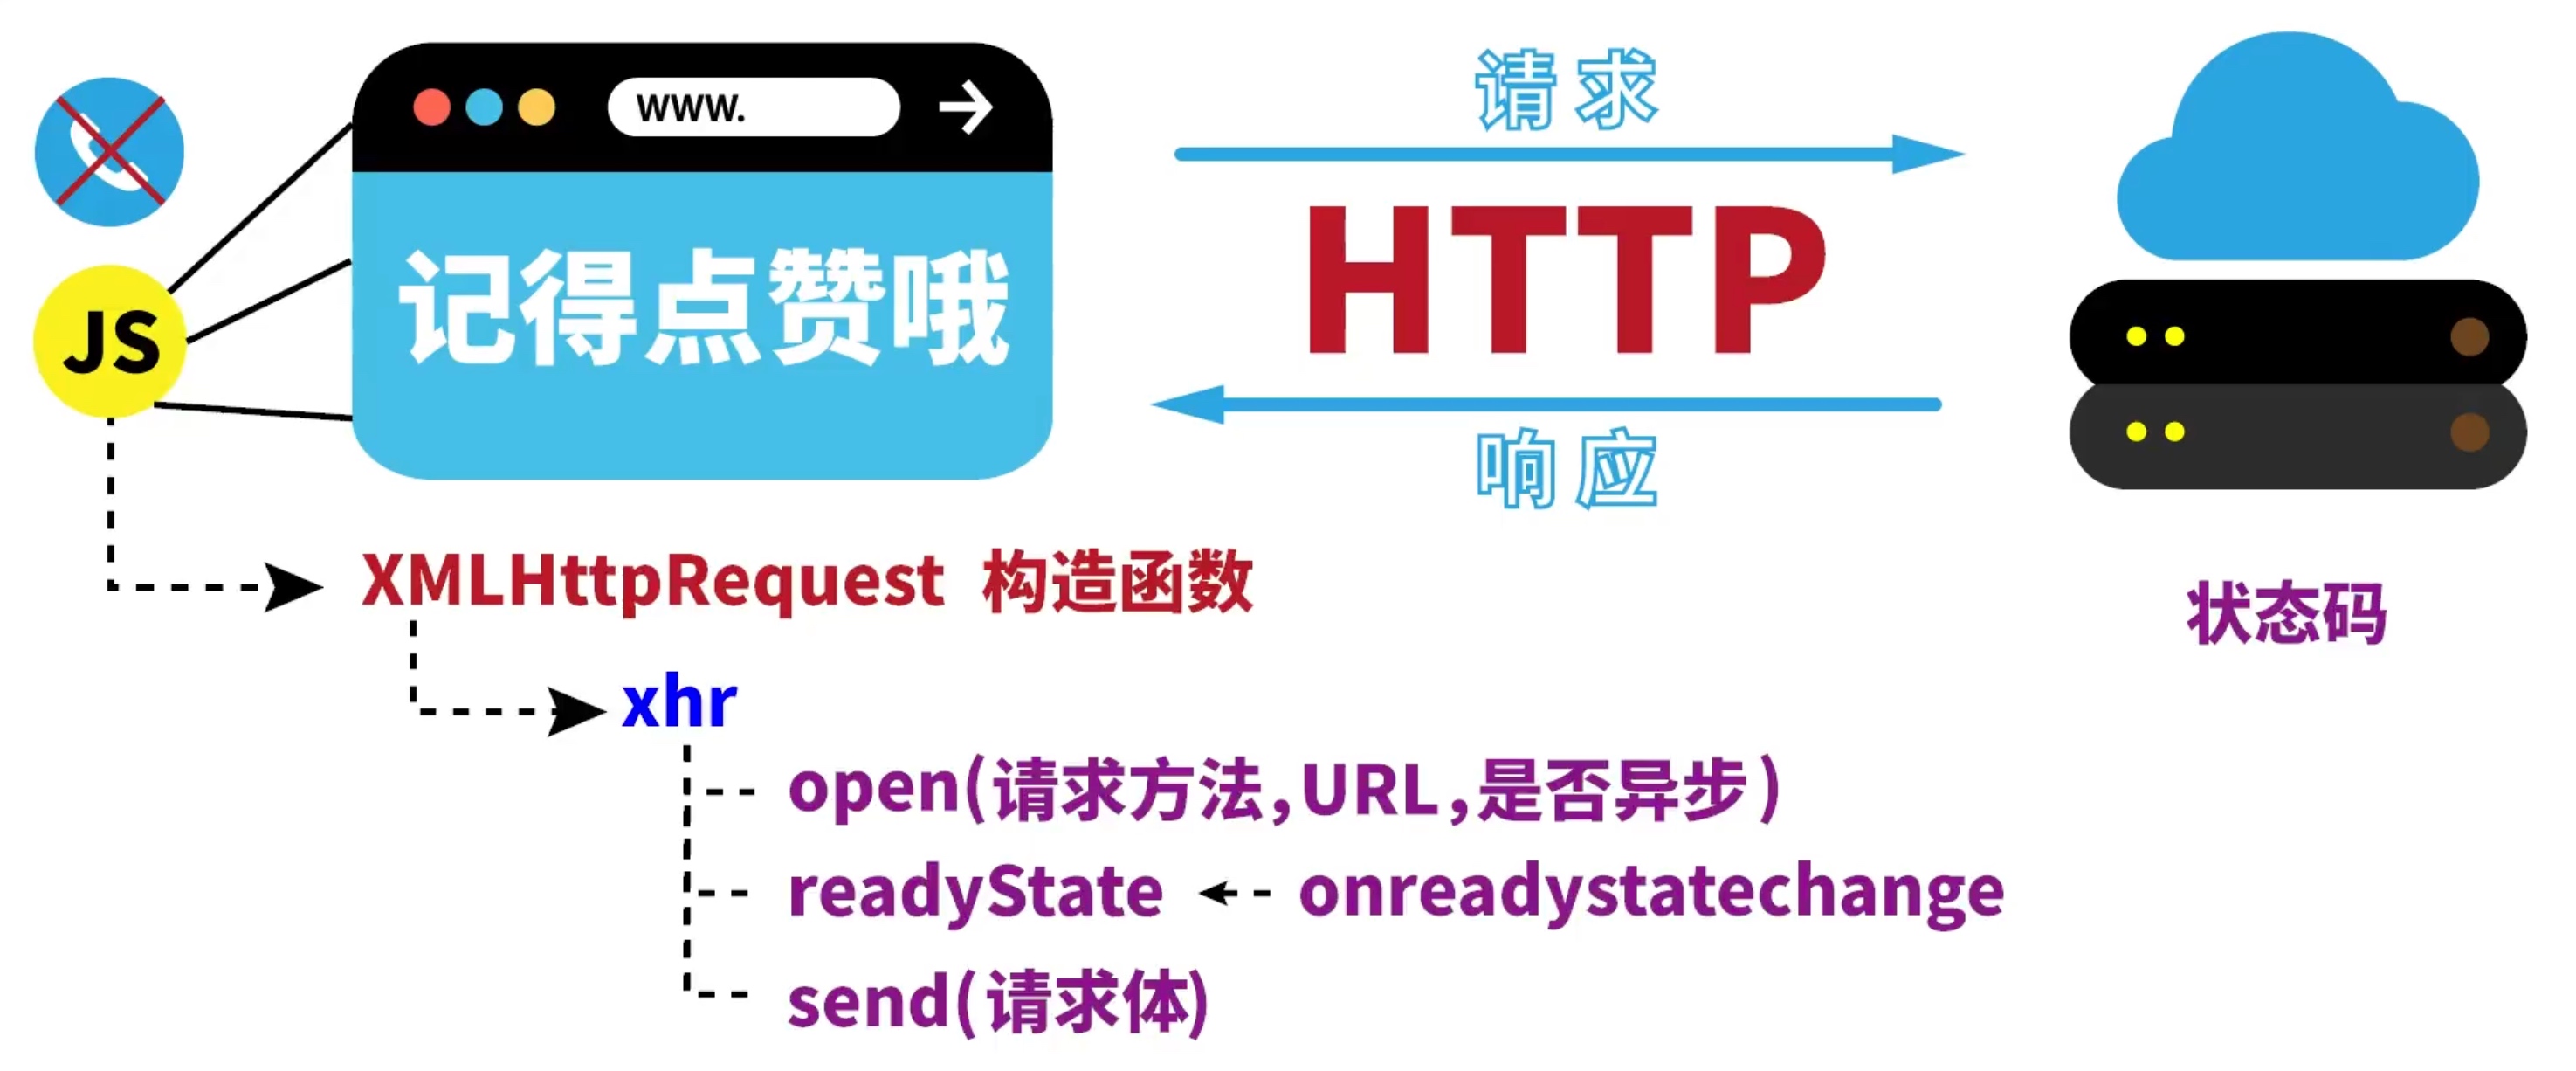
Ajax并不是一个单一的编程语言,主要的作用就是可以部分刷新页面,而不用重新刷新整个网页
用Promise封装,需要掌握吗?
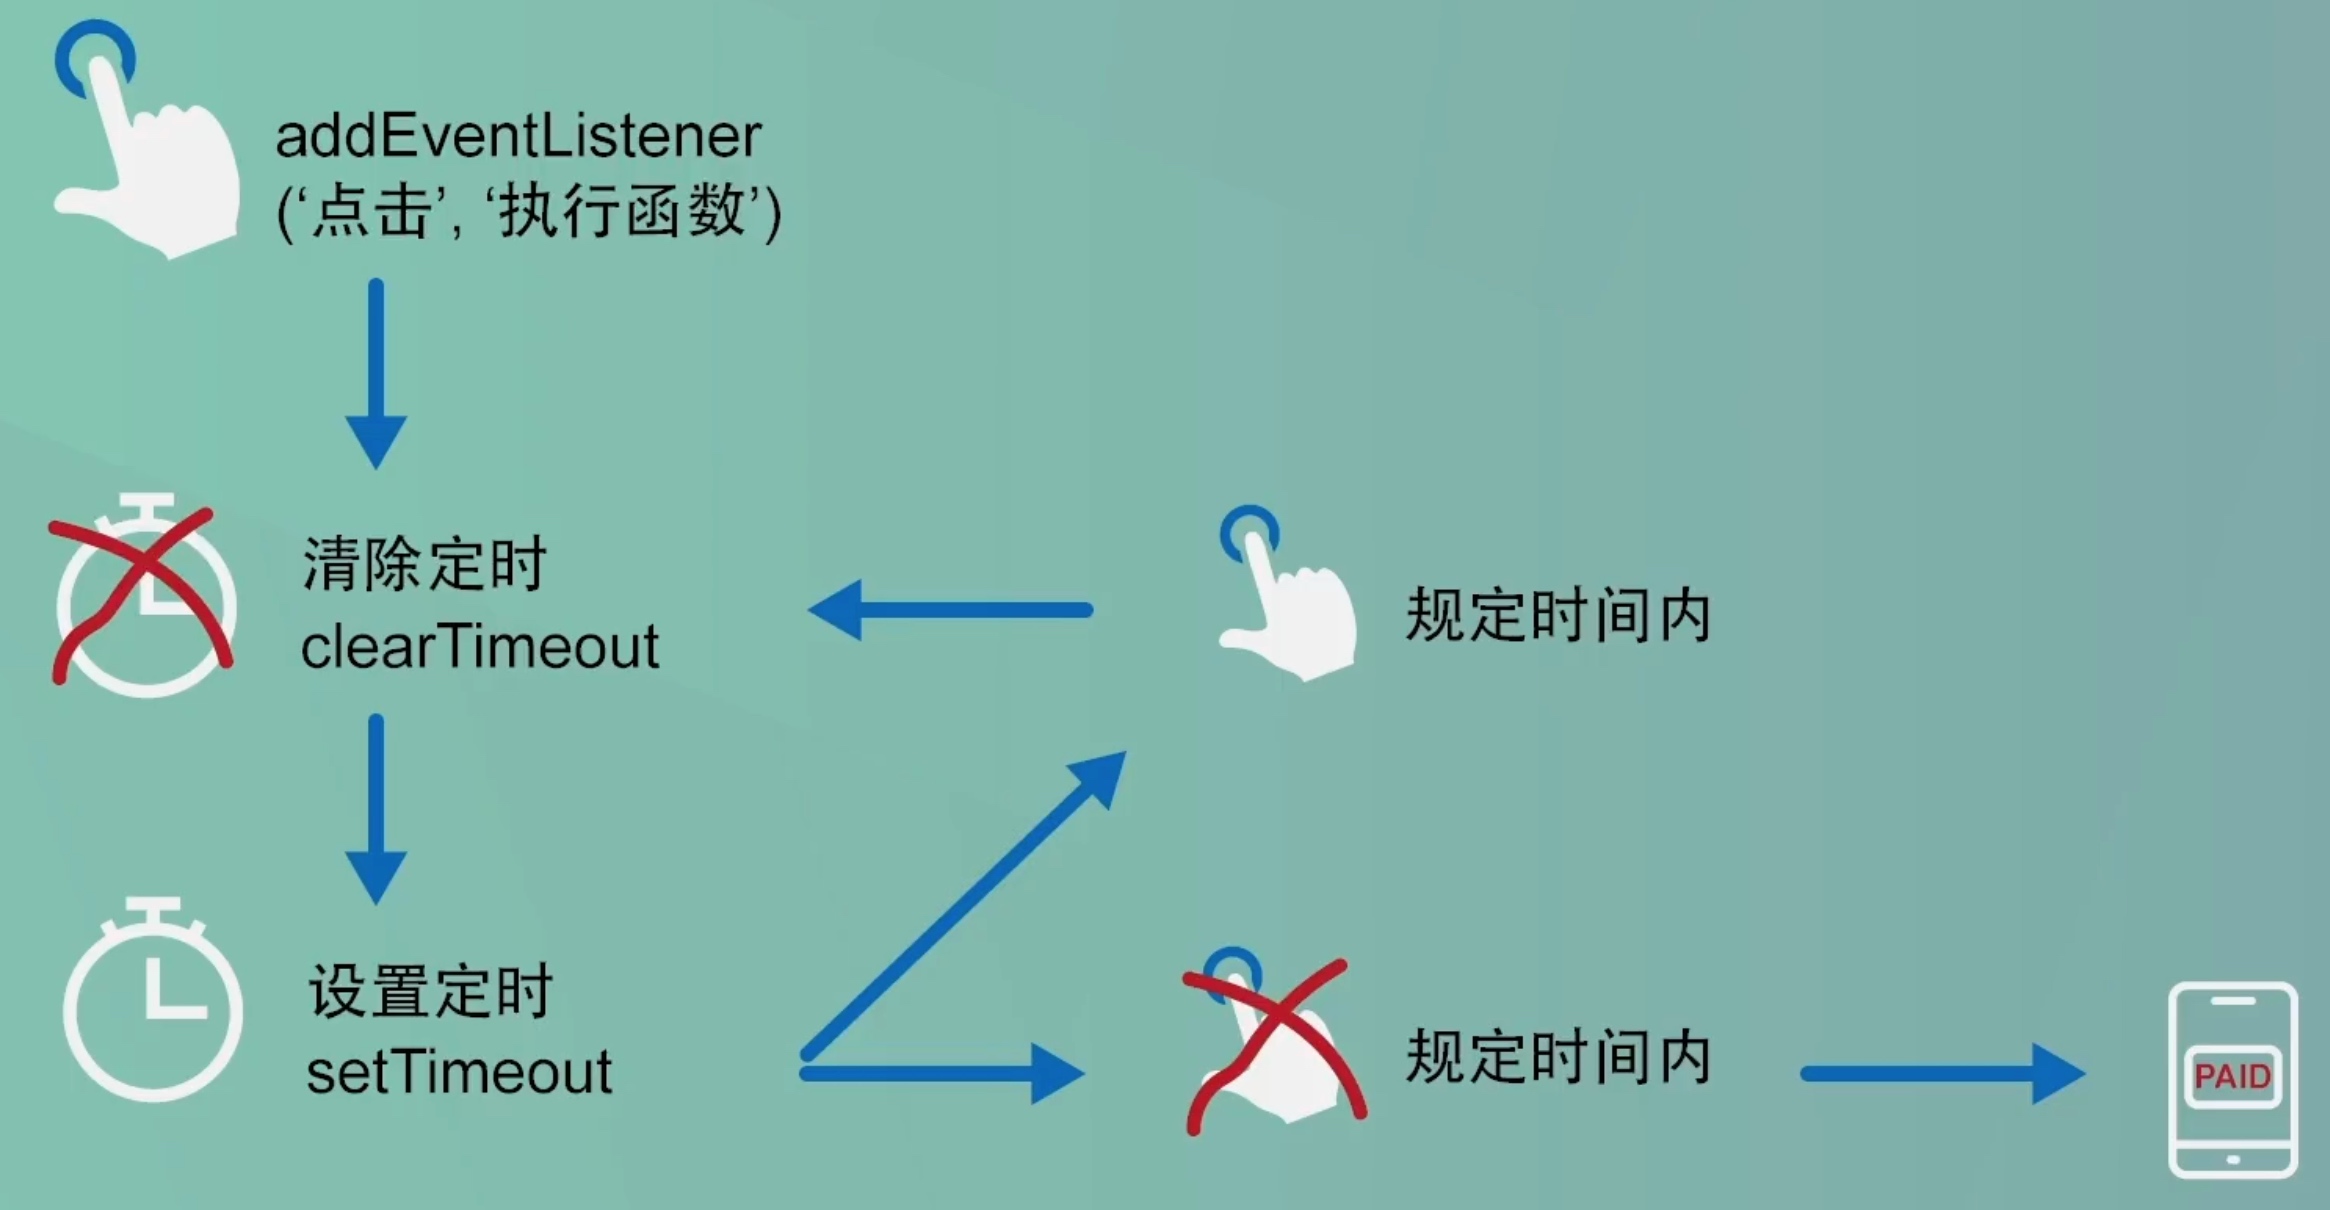
防抖
- 触发事件
- setTimeout
- clearTimeout
web开发中需要用上防抖的地方
- 改变页面大小的统计
- 滚动页面位置的统计
- 输入框连续输入的请求次数控制
防止表单多次提交的案例
1
2
3
4
5
6
7
8
9
10
11
12
13
14
15
16
17
18
19
| const button = document.querySelector('input')
function payMoney(){
console.log('付款')
}
function debounce(func, delay){
let timer;
return function(){
let context = this
let args = arguments
clearTimeout(timer)
let timer = setTimeout(function(){
func.apply(context, args)
}, delay)
}
}
button.addEventListener('click, debounce(payMoney, 1000)')
|
1
2
3
4
5
6
7
8
9
| function debounce(fn, delay) {
let timer = null
return function(){
if(timer) {
clearTimeout(timer)
}
timer = setTimeout(fn, delay)
}
}
|
节流
在触发事件的时候就马上执行任务,然后设定时间间隔限制,在这段时间内无论用户如何操作都忽视,在时间到了之后如果检测到用户有操作行为,再次执行任务并设置时间间隔
1
2
3
4
5
6
7
8
9
10
11
12
13
14
| function throttle(func, delay){
let timer;
return function(){
let context = this
let args = arguments
if (timer){
return
}
timer = setTimeout(function(){
func.apply(context, args)
timer = null
}, delay)
}
}
|
1
2
3
4
5
6
7
8
9
10
| function throttle(fn, delay) {
let timer = null;
return function() {
if(timer) return false
timer = setTimeout(() => {
fn()
timer = null
}, delay)
}
}
|
defer和async的区别
- 两者都是异步下载,加载文件的时候不阻塞页面的渲染,但是执行时刻不一样。
- async 脚本在他下载结束之后立刻执行,同时会在 window.onload 事件之前执行,所以就有可能出现脚本执行顺序被打乱的情况
- defer 的脚本都是在页面解析完毕之后,按照原本的顺序执行,同时会在 document.DOMContentLoaded 之前执行


